
Updated on May. 16, 2025
Position: Resource - Disk Utilities - 11 Fixes to SYSTEM THREAD EXCEPTION NOT HANDLED Error in Windows 10/11
DiskGenius - Free backup software that can image hard drives, clone an HDD to SSDs, back up any partition into an image file, migrate Windows OS, clone virtual disks, etc.
"Hello everyone, yesterday I was playing games on my laptop, and it suddenly froze. I waited for several minutes, but nothing changed. Finally, I force restarted the computer, but I got a blue screen with stop code SYSTEM_THREAD_EXCEPTION_NOT_HANDLED (Dxgmms2.sys). I tried restarting computer a couple of times and always got the BSOD. How can I fix the error without reinstalling Windows?"
What does it mean when it says system thread exception not handled? The error means that a system thread generated an exception which the error handler was unable to catch. Normally, when you press the power button on your desktop or laptop, your computer is supposed to boot into Windows OS. However, in some cases, the Windows 11, Windows 10, Windows 8, or Windows 7 are not loaded properly, and a blue screen appears instead. Whether you are a computer expert or not, the BSOD problem happens unpredictably.
On the blue screen, you can see error messages:
Your PC ran into a problem and needs to restart.
We'll restart for you.
For more information about this issue and possible fixes, visit https://www.windows.com/stopcode
If you call a support person, give them this info:
Stop code: SYSTEM THREAD EXCEPTION NOT HANDLED

This is one of the typical BSOD stop codes, and it apparently blocks the computer from being used. As a result, you cannot access either Windows or personal files on the computer. In some cases, there is a name of a driver file appearing together with the stop code "system_thread_exception_not_handled", for example,
Before we step forward to fix the error, we'd like to talk about possible reasons behind the error. The exact cause can vary depending on the system, so the real cause cannot be easily determined before analyzing the memory dump file, and yet we will list common causes:
Without wasting much time, let's get started to fix the error. The next content includes 11 approaches that take you through to resolve the blue screen error for Windows 11, Windows 10, Windows 8.1, Windows 8 and Windows 7 computers.
Tip: If you've recently installed or connected any new hardware device to the computer, such as a graphics card, memory, hard disk, etc., then try starting computer after removing the hardware. If the newly installed hardware is not compatible with your computer, it is likely to cause a BSOD problem.
First and foremost, we need to access the Safe Mode so that we can carry out various fixes. There are multiple ways of entering Safe Mode, but the computer cannot boot for the moment, so the recommended procedure of booting into Safe Mode is below:
Step 1. Enter WinRE (Windows Recovery Environment).
1. Restart the computer. Press and hold the power button for 10 second as soon as you see Windows gets started or manufacturer's logo presents.
2. Press the power button to turn on computer again. Then press and hold the power button for 10 seconds to turn off computer on the first sign that Windows gets started.
3. Repeat previous steps until you enter WinRE.
Step 2. Boot into Safe Mode.
1. When you see "Choose an option" screen, click Troubleshoot > Advanced options > Startup Settings > Restart.
2. After the computer restarts, you can see a list of options, see the picture below. To enter Safe Mode with Networking, press F5.

After entering Safe Mode, you can start following fixes.
Drivers are often the root cause of this BSOD. Here's how to identify and fix faulty drivers:
Step 1. Identify which drive is faulty.
1. Right-click the Start menu and choose "Event Viewer".
2. Expand Windows Logs > System on the left pane.
3. Find any entries related to "system thread exception not handled" or "system_thread_exception_not_handled" in the middle pane and click it to see the problematic driver.
Step 2. Roll back the faulty driver to its previous version.
1. Right-click the Start menu and choose Device Manager.
2. Locate and right-click the problematic device, right-click it, and select "Properties".
3. Click the "Driver" tab and click the "Roll Back Driver" button.
This will revert the driver to its previously installed version. If this method cannot fix the BSOD, try updating drivers instead.
Step 3. Update drivers.
1. Right-click the same device and choose "Update driver".

2. On the pop-up window, click "Search automatically for updated driver software".
3. Try searching for updated drivers on Windows Update or on the device manufacturer's website if Windows has determined that the best driver for this device has already been installed.
If updating drivers cannot fix the SYSTEM THREAD EXCEPTION NOT HANDLED error, you can try renaming the file which is associated with the error. Here is how to do so:
Step 1. Double click "This PC" icon to open Windows File Explorer.
Step 2. Open the path "C:\Windows\System32\drivers" and you can see all driver file names.
Step 3. Look for the driver that is causing the BSOD stop code, such as dxgmms2.sys. Right-click it and select "Rename".
Step 4. Add ".old" extension to the end of the file name (e.g., dxgmms2.sys.old).
Step 5. Click "Yes" to continue if you are asked to give administrative permission.
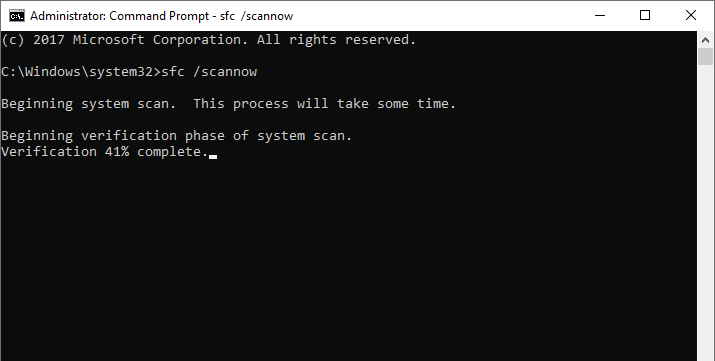
The System File Check (SFC) command can check and repair corrupted system files automatically, and it is quite simple to run SFC.
Step 1. Type cmd in the searching box to find Command Prompt. Launch Command Prompt as administrator.
Step 2. Type sfc /scannow and press Enter key.
The process may take a couple of minutes. Wait for the scan to complete and follow any on-screen instructions. If the SFC not working, the scan may end up with errors like "Windows Resource Protection found corrupt files but was unable to fix some of them".
It is common that bad sectors bring about BSOD problems. Thus, you may as well check bad sectors for hard drives, SSDs, and external hard drives connected to the computer.
DiskGenius Free Edition provides the feature to check and repair bad sectors for both internal and external storage devices. And the software works smoothly in Windows Safe Mode, Windows PE, Windows Server, and Windows 11/10/8/7/Vista/XP. Here are steps to check bad sectors:
Step 1. Install and launch DiskGenius Free Edition. Select one of the hard disks or SSDs from the disk list on the left pane of the software, and click "Disk" – "Verify Or Repair Bad Sectors".

Step 2. Click "Start Verify" button on the pop-up window and the application starts to scan the drive.

Step 3. Wait for the scanning to complete. Do not access the drive during the scanning.
If bad sectors are found, back up important files immediately, after which you can either choose to repair them or replace the drive if necessary.

Viruses or malware not only threats data safety but also affects OS booting, as critical system files can be destroyed or lost due to virus or malware. Performing a full scan for computer, including operating system, is necessary. Free protection software is built-in Windows, and there is no need to install third-party anti-virus software. Below are steps to scan computer for virus and malicious software:
Step 1. Right-click the Start menu and choose Settings.
Step 2. Click Update & Security > Windows Security > Virus & threat protection > Scan options.
Step 3. Select "Full scan" and click "Scan now". The scanning process may take more than an hour, because it checks all files and running programs on the hard drive.

Sometimes blue screen errors are caused by corrupted system files, vulnerabilities, or bugs, and you need to try installing the latest Windows updates that address bugs and compatibility issues.
To manually check and install updates, go through steps below:
Step 1. Right-click the Start menu to choose "Settings".
Step 2. Click Update & Security > Windows Update > Check for updates.
Step 3. Click "Download and install". Your computer may need to restart to complete the installation of updates.
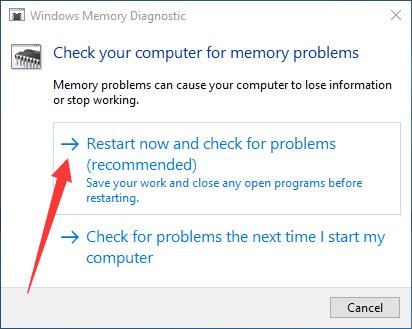
There is a free RAM testing tool built in Windows 11, Windows 10, Windows 7, and other modern versions of Windows operating system. Problematic memory can cause computer to stop working or even lose information. Check problems for RAM with steps below:
Step 1. Type "Windows Memory Diagnostic" in the searching box next to the Start menu and click "Run as administrator".
Step 2. Click "Restart now and check for problems".
This fix requires that you have a restore point which was created when Windows was running properly. When backups are not available for the moment, move to Method #9.
Step 1. Right-click the Start menu and choose "Settings".
Step 2. When Windows Settings window pops up, type "Recovery" in the searching box and choose "Recovery" from drop-down list.
Step 3. Click "Open System Restore" under advanced recovery tools. This option will undo recent changes, but leave files such as documents, pictures, and music unchanged.
Step 4. Select a restore point and click "Next" button. Then Windows will roll back to the selected point.

A buggy or outdated BIOS can cause hardware communication issues that lead to blue screen errors. In some cases, the SYSTEM_THREAD_EXCEPTION_NOT_HANDLED error may be the result that the motherboard firmware is not fully compatible with newer Windows updates or drivers. So you can try updating BIOS to fix low-level stability issues.
Important: Updating BIOS can be a risky attempt. Please carefuly follow your manufacturer's instructions, as any interruptions or incorrect updates can cause your PC to become unbootable.
Step 1. Type "System Information" in the searching box and open it. Then look for BIOS Version/Date in the System information window.
Step 2. Visit the motherboard/computer manufacturer's support page to find the exact model. You can also check the model name in System Information)
Step 3. Download the latest BIOS update. Locate the BIOS/UEFI section under Drivers or Firmware. Next, read the changelog to ensure the update addresses system stability or compatibility.
Step 4. Follow the update instructions provided by the manufacturer.
Some systems offer an EZ Flash utility in the BIOS itself, others may require a USB drive formatted to FAT32 with the BIOS file and a specific name. Alternatively, manufacturers like Dell or Lenovo offer BIOS update tools that run directly within Windows
Step 5. Restart and complete the update.
Notes:
Do not power off your computer during the update.
The system may restart multiple times.
Step 6. After update, reset BIOS settings if needed. You may be prompted to Load Optimized Defaults—accept this unless you had custom BIOS settings
Windows creates a small memory dump file (.dmp) every time a blue screen error occurs. These files contain valuable debugging information—such as which driver or process triggered the crash—that can help pinpoint the root cause of the SYSTEM_THREAD_EXCEPTION_NOT_HANDLED error. By analyzing the minidump, you can often identify the specific component that needs attention.
Step 1. Navigate to C:\Windows\Minidump to find the dump file.
If the folder is empty, make sure your system is configured to create small memory dumps:
1. Go to the Start menu > Settings > System > About > Advanced system settings.
2. Under the Startup and Recovery section, click Settings. Then ensure the Write debugging information is set to Small memory dump (256 KB).
Step 2. Download and install a debugging tool WinDbg Preview which can be found from the Miscrosoft Store.
Step 3. Launch WinDbg Preview, click File > Open Dump File > select the latest .dmp file.
Step 4. After the file loads, type the following command in the debugger's command bar and press Enter.
!analyze -v
The tool will display detailed crash information, including the faulting module or driver name (often highlighted under "MODULE_NAME" or "Probably caused by").
Once the analysis is done, look for references to specific .sys files or drivers. These clues can guide you toward the problematic device or driver that needs to be updated or replaced.
The last resort to fix the "system thread exception not handled" stop code is reinstalling Windows. It's OK to choose reset PC if you feel it is easier than a clean installation of Windows. Remember to back up files you want to keep to another hard disk before starting reinstalling or resetting Windows.
DiskGenius Professional Edition is capable data recovery software as well as partition manager software. With this tool, you can recover lost files from crashed internal hard drives of desktops or laptops, recover files from RAW partitions, search for deleted or partitions, undelete files from empty Recycle Bin, recover photos from SD cards, recover corrupted USB drive data, and more.
Tip: DiskGenius supports recovering lost files and partitions in Windows Safe Mode. So you can start the data recovery after entering Windows Safe Mode. However, if you cannot access the Safe Mode, you can create a bootable USB drive using DiskGenius. Then boot the crashed computer with the USB drive and start the recovery.
Step 1. Create a bootable USB drive using DiskGenius Free Edition.
1. Insert a USB drive to computer and launch DiskGenius Free Edition.
2. Select the USB drive in the software and click "Tools" – "Create WinPE Bootable USB Drive of DiskGenius".

3. Click "OK" button and wait for several seconds. Then the bootable drive will be created successfully.

After handling the unbootable issue, we can start the data recovery process.
Step 2. Right-click the drive that needs recovering data and choose "Recover Lost Files".

Step 3. Click "Start" button to initiate the scanning process.
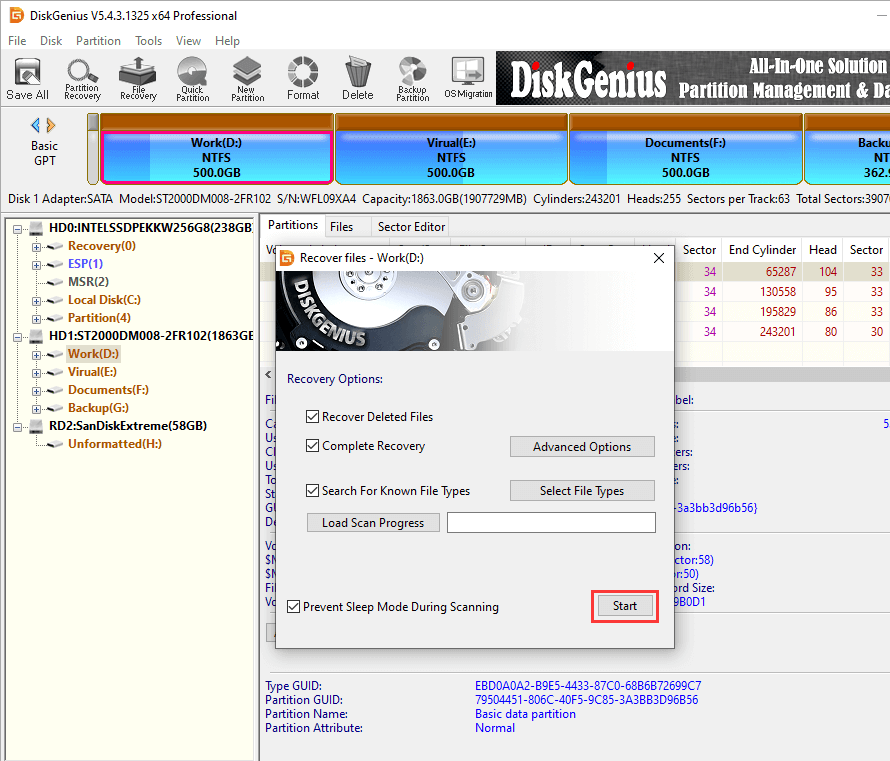
Step 4. Wait for the file scanning to finish.
Lost files discovered during the scan are continually added to the scan results.

Step 5. Preview lost files after the scanning is done. Previewing files allows you to check the chance of a successful recovery.
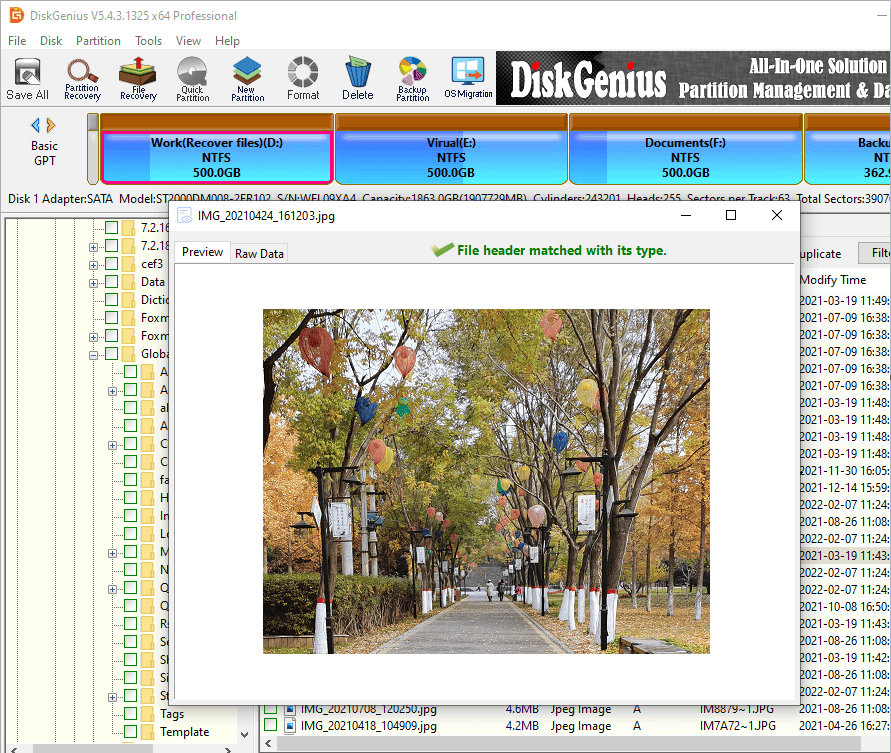
Step 6. Copy files you want to restore to a different location.

1. Is system thread exception not handled bad?
Yes, it is not good news in most cases. The "System thread exception not handled" error is one of the BSOD stop codes occurred to Windows 8, Windows 10 and Windows 11 computers. It prevents computers from booting into Windows properly. As a result, you cannot access files or even lose important data.
2. How do I run Windows in Safe Mode?
Here are steps to start computer in safe mode in Windows 11/10/8/7:
Step 1. Start menu > Settings > Update & Security > Recovery > Advanced startup > Restart now.
Step 2. Restart computer > Choose an option > Troubleshoot > Advanced options > Startup Settings > Restart.
Step 3. Restart computer > Press F4 for Safe Mode or press F5 for Safe Mode with Networking.
3. How do I fix system service exception in Windows 11?
System service exception is one of the Windows stop codes, and it usually occurs when the hardware or software goes wrong. To fix the error, you can try these tricks: install system updates, update drives, check and repair bad sectors for hard disk, run SFC to fix errors in system files, uninstall recently installed software and hardware, reset Windows OS, etc.
4. How do you fix a bad pool caller?
The "Your PC ran into a problem and needs to restart. We're just collecting some error info, and then we'll restart for you. You can search for the error online. Stop code: BAD_POOL_CALLER" error indicates that configurations of the computer need to be changed to previous status. Here is how to fix the error:
Step 1. Repeat restarting computer until you see the "Please wait" message.
Step 2. Then click Troubleshoot > Advanced options > Startup Settings > Restart.
Step 3. Choose "last known good configuration" during restarting.
Step 4. Open Device Manager > click "Scan for hardware changes". Then restart computer again.
5. Should I switch to Windows 11?
It is worthwhile to upgrade to Windows 11 for most users, for it is designed with new features and better performance. Moreover, there is not that much risk to upgrade to Windows 11, because you can roll back to Windows 10 within a certain period of time. So, you can give it a shot if the hardware of your computer meets the requirements of Windows 11.
6. How long does a Windows system restore take?
The system restore process generally takes around half an hour or longer, and the process can also get stuck if there is something wrong with the hard disk. It is suggested to try some troubleshooting if the restoring process takes over 4 hours and there is not further progress.
7. How do I fix system thread exception not handled Vgk sys?
When your computer gets stuck in vgk.sys BSOD loop, you can try following methods to fix it.
8. Why does system service exception happen?
The System Service Exception error can be caused by various reasons for example, corrupted or outdated drives, some applications try to access Windows-protected codes, buggy Windows updated, corrupted system files, cyberattacks, etc.
DiskGenius - The best free partition manager software to resize partitions, create bootable USB drives, rebuild MBR, check and repair bad sectors, clone an HDD to smaller SSDs, etc.

DiskGenius is a one-stop solution to recover lost data, manage partitions, and back up data in Windows.
Download DiskGenius
 DiskGenius Free
 DiskGenius Standard
 DiskGenius Professional
 Edition Comparison


 Facebook
 YouTube
 Twitter